nodehunter module
The nodehunter module is a Python based executable that takes advantage of the NMAP API to perform a field expedient method of interrogating the cyberspace terrain for live nodes, ports, and services. It is loud and meant to provide the most holistic picture of the terrain. The follow types of node discovery are conducted: ARP, TCP SYN, TCP ACK, UDP, SCTP INIT, ICMP Echo Request, ICMP Timestamp Request, ICMP Address Mask Query, and IP Protocol Discovery. When executing with -a it utilizes all of the aforementioned discovery scans, plus a Full TCP Connect Scan of all 65,535 TCP ports of each unique IP, and Service Enumeration on each unique open port. This tutorial was written with execution of nodehunter on Mercenary-Linux. If it is used on another platform additional dependencies may be required.
Download and Prepare
Install Dependencies:
sudo pip install python-nmap termcolor neo4jrestclient
Git NodeHunter:
git clone https://github.com/slacker007/NodeHunter
Change directories:
cd NodeHunter
Ensure that the neo4j service is running (see "Custom Modules")
Help
Open a terminal and type:
sudo python ./nodehunter.py -h to view the available options:
Only Preform Node Discovery
Type: sudo python ./nodehunter.py -nto perform only node discovery
Enter the target address/range/CIDR:
Nodehunter will conduct each of the discovery scans starting with an ARP scan and completes with the ipp (IP Protocol Discovery Scan).Nodes discovered will be displayed under each respective scan, as shown in the figure. The "Total Nodes" will only count unique nodes across all discover scans. When "Total Nodes" is displayed the discovery scan is complete and the data is now ready to be sent to the neo4j server.
Within Mercenary-Linux the default IP of the neo4j is "localhost" so you can hit enter. Then enter the default neo4j username and password for Mercenary-Linux, unless you changed it when setting up ne04j as explained in the Custom Modules Chapter:
- username:
neo4j - password:
neo4j
Browse to http://localhost:7474 on your browser and click the "Node label" DISCOVERED_NODES. This picture depicts the graph visualization of the DISCOVERED_NODES.
This picture depicts the text view of the DISCOVERED_NODES:
Perform node, port, and service discovery
Follow the same process as you did with node discovery, but instead of -n type: sudo python ./nodehunter.py -ato perform node, port, and service discovery.
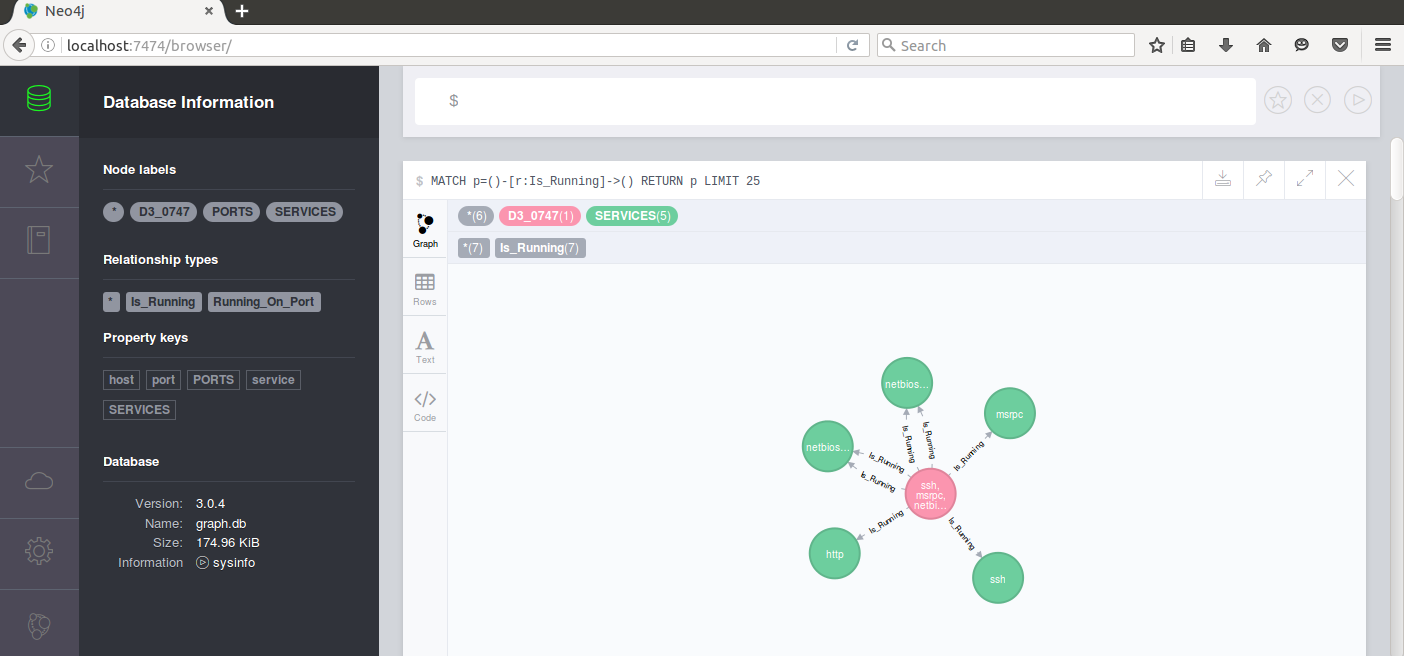
Now go navigate to http://localhost:7474. Click "Is_Running" under "Relationship Types" to display the relationship between nodes and services.

In this image, note that there are two node labels for "D3-TIME" which represents the nodes discovered for a particular scan time. You will notice that if you click the relationship type, it will show you the relationship for all available times. To alleviate this problem you can type in:
MATCH (p:D3_0755)-[r:Is_Running]->() RETURN r LIMIT 200
NOTE: The `LIMIT 200 is used to avoid crashing your browser if too many results are returned. You can drop it from your query if you are certain it will not crash your browser.